
Share This Article
Discover how to craft your own DIY bell-bottom jeans with this straightforward tutorial. Bell bottoms, an iconic fashion statement of the 1960s and 1970s, remain a stylish and playful way to refresh your closet. If you enjoy repurposing materials and desire to transform a pre-loved pair of jeans into something striking and original, converting them into bell bottoms is an excellent DIY undertaking! This guide offers a detailed, step-by-step method for turning your jeans into bell bottoms using fabric inserts, drawing inspiration from the far-out styles of yesteryear. Eager to begin? Let’s jump in!

Advertisement
🔥 Fast & Free Download

Essential Supplies for Your Project
Prior to embarking on the sewing process, gather the following items:
- Used Jeans: Jeans with a slimmer leg profile are ideal for this endeavor, although any style will suffice.
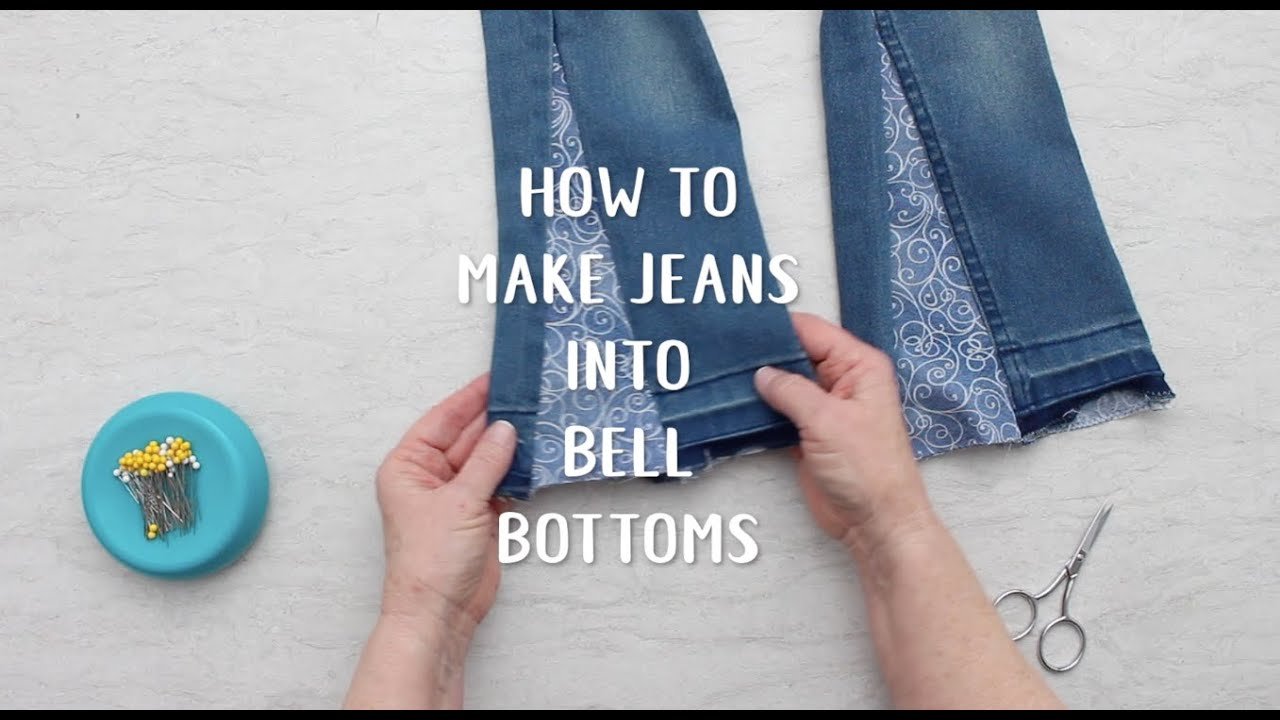
- Material for Insets: Feel free to select any material you desire—whether it’s a lively, patterned textile or denim in a complementary or contrasting hue.
- Seam Ripper: Crucial for disassembling the existing seams of your jeans.
- Pins: Useful for securing the fabric in position while you sew.
- Ruler: For precise measurements when cutting and sewing.
- Scissors: Sufficiently sharp for cutting fabric.
- Sewing Machine: To reliably stitch your fabric insets into place.
- Paper: For crafting the triangle template.
With all these necessities at hand, you’re fully prepared to begin your bell-bottom adventure!
Detailed Instructions: A Step-by-Step Guide
Discover the art of creating DIY bell bottoms with clear, step-by-step guidance. Personalize and style your jeans using simple techniques for a fashionable, flared silhouette.
Step 1: Getting Your Jeans Ready
Uncover the secrets to effortlessly revamping your jeans. Learn to select and mark the flare point before carefully dismantling the seams for a personalized style.
Selecting Your Jeans and Determining the Flare Commencement
Select a pair of jeans you intend to repurpose. Jeans with a more fitted or tapered cut will yield a more pronounced bell-bottom effect. The initial step is to try them on and decide where you want the flare to initiate. This is typically situated just below the knee. For children’s sizes, this measurement is generally around 8.5 inches above the hem, while for adults, it may be closer to 18 inches. However, this dimension can fluctuate based on your individual style inclinations. Once you’ve pinpointed the ideal location, mark it on both sides of each pant leg.

Dismantling the Seams
Invert the jeans to facilitate easier handling. You’ll be opening the seams along both sides of each leg, extending from the bottom hem up to your designated mark. Exercise caution with the seam ripper, as it’s quite sharp and can potentially damage the fabric if used hastily. A chain stitch, frequently employed in jeans construction, may streamline this process—once you locate the correct thread, the seam should unravel swiftly. Should you not encounter this ease, simply proceed deliberately to carefully detach the seams.
Also, detach the hem at the base of the jeans, as this will permit the fabric insert to cascade freely once sewn in. You should now have two expansive openings on each leg, which will accommodate your fabric inserts.

Step 2: Creating Your Fabric Inset Template
Learn the process of fashioning your fabric inset template, complete with step-by-step instructions on measuring, drawing triangles, and precisely cutting your fabric.
Taking Measurements and Sketching the Triangle
Now it’s time to construct the triangular inset that will establish the bell shape of your bell bottoms. Place a sheet of paper on a level surface and sketch a triangle. The base of the triangle will dictate the width of your bell bottoms. For a smaller child, a base of approximately 3 inches should suffice, while for an adult, you might opt for up to 7 inches. This is entirely subject to your preference—if you desire a dramatic “elephant bell” aesthetic, broaden the base!
Measure the distance from the bottom hemline (where you detached the seam) up to the flare point and ensure your triangle is sufficiently tall to reach this point. For instance, if you measured 10 inches upward from the hem, make your triangle at least 10 inches in height.
Once your triangle template is complete, cut it out. You’ll employ this to cut your fabric insets.

Cutting Your Material
Lay your selected material flat and affix the paper triangle template on top with pins. You’ll require four triangle-shaped fabric insets—two for each leg. You can cut all four pieces simultaneously if your scissors are sharp and your hand is steady. After cutting the material, remove the pins and reserve your fabric insets.
Step 3: Attaching and Sewing the Insets
Discover the art of pinning and sewing insets with this simple guide. Master the seamless attachment and securement of insets for your sewing projects.
Affixing the Insets
With your jeans still inverted, grasp one fabric triangle and pin it into the open seam of one leg. Align the base of the triangle with the bottom hem of the jeans and pin continuously up to the point where the flare commences. Replicate this action for the opposite side of the leg, pinning a triangle onto both the inner and outer seams. Repeat this process for the other leg.
Ensure the fabric lies flat as you pin, so the material doesn’t accumulate when you sew. Also, confirm that the right side of the fabric is oriented toward the right side of the denim to attain a polished finish.

Stitching the Insets Securely
Now, prepare your sewing machine! Commence by stitching one side of the triangle inset, extending from the bottom hem up to the flare point, utilizing a half-inch seam allowance. Backstitch at both the start and end of the seam to reinforce it. Once one side is complete, stitch the other side in an identical manner.
Reiterate this procedure for the other leg, stitching both sides of the triangle inset securely. Subsequent to sewing, employ a zigzag stitch along the unfinished edges of the material to avert fraying.

Step 4: Final Details
Refine your garment with precise fit evaluations and immaculate finishes. Learn to zigzag or hem the bottoms for a professional-caliber result.
Assessing the Fit and Finish
Once all four triangle insets have been stitched in place, revert the jeans to their correct orientation to assess the fit and flare of your newly fashioned bell bottoms. They should exhibit a widening at the base, with the incorporated material creating the characteristic bell-bottom silhouette.
Zigzag Stitching or Hemming the Bottoms
Now, examine the bottom hem of your jeans. You can opt to leave the edge raw if you’re aiming for that 70s-inspired, frayed aesthetic. To achieve this, simply apply a zigzag stitch along the bottom edge to curtail excessive fraying, and leave the raw edges as they are. Over time, they’ll cultivate a vintage, worn-in appearance.

If you favor a more refined finish, fold the bottom hem upward once or twice and stitch it in position. Employ a straight stitch in close proximity to the edge for a professional-looking outcome.
Step 5: Style Your Bell Bottoms and Flaunt Your Creation!
Congratulations! Your DIY bell bottoms are now complete and primed for wear. Having repurposed your jeans into something revitalized and playful, it’s time to showcase them. Coordinate them with your preferred tops, footwear, and accessories for a contemporary interpretation of retro fashion. Whether you’re dressing up for a themed occasion or simply aspiring to inject some groovy panache into your everyday attire, your new bell-bottoms are certain to garner attention.
Suggestions and Techniques for Tailoring Your Bell Bottoms
Here are some supplementary suggestions to render your bell-bottoms even more distinctive:
- Opt for Striking Materials: Infuse some character into your jeans with patterned or vividly hued fabric insets. Floral motifs, tie-dye patterns, or even sequins can elevate the prominence of your bell-bottoms.
- Incorporate Embellishments: For an augmented infusion of 70s-inspired flair, contemplate stitching on patches, embroidery, or even beads to your bell-bottoms.
- Experiment with Length: Bell bottoms need not be full-length. Attempt cropping them into capri pants or maintaining them slightly longer for a bohemian vibe.
- Utilize Denim: If you gravitate toward a more understated aesthetic, employ denim material that either harmonizes with or contrasts against your jeans, as opposed to a flamboyant pattern.
- Repurpose Existing Garments: Upcycling isn’t solely reserved for jeans—if you possess an antiquated denim skirt or overalls, you can apply the same methodology to impart a bell-bottom twist to them.
Final Wording:
Upcycling old jeans into bell bottoms is a fun and rewarding project that’s perfect for anyone who loves fashion, creativity, and sustainability. Whether you’re revisiting a classic style from the past or trying bell bottoms for the first time, this DIY project allows you to customize your wardrobe while giving new life to an old pair of jeans. Follow these steps, and soon you’ll be rocking your own groovy bell bottoms with pride!
Remember, the beauty of this project lies in its flexibility. You can go as bold or as subtle as you like with fabric choices and embellishments, making each pair of bell bottoms truly one-of-a-kind.
FAQs About DIY Bell Bottoms
Discover answers to common questions about DIY bell bottoms. Learn techniques, materials, and styling tips for your custom jeans!
1. How can I make sure the fabric insert fits properly?
To ensure the fabric insert fits well, measure the height from the hem to where the flare starts, and the width of the opening. Your triangle should match these dimensions, plus an additional ½ inch on each side for seam allowance.
2. What if I don’t have a sewing machine?
You can sew the inserts by hand using a strong backstitch. It will take longer but can still give sturdy results. Be patient and use even stitches for a clean look.
3. Can I use other types of fabric besides denim?
Yes! You can use patterned fabric, cotton, or even stretch materials. Make sure the fabric you choose complements the denim’s weight and style.
4. How do I avoid damaging the fabric when ripping the seams?
Use a seam ripper carefully, focusing on cutting individual stitches instead of pulling at the fabric. Going slowly and being patient will help prevent unwanted tears.
5. Can I do this with jeans that have already been hemmed or altered?
Yes, just be mindful of any existing alterations. You may need to adjust the pattern or fabric placement to accommodate previous changes to the jeans.
6. What if my fabric frays easily?
If your fabric is prone to fraying, use a zigzag stitch or serge the edges after sewing the inserts to prevent unraveling over time.
7. How can I make the flare more dramatic?
For a more dramatic bell-bottom look, widen the base of your fabric insert. A wider base makes a larger flare, so feel free to experiment based on your style preferences.
8. What do I do if I make a mistake while sewing?
If you sew the insert incorrectly or find a mistake, carefully remove the stitches with a seam ripper and re-pin the fabric. Take your time to ensure a better fit.
9. Is there a way to upcycle other garments using this method?
Absolutely! You can upcycle skirts or overalls with the same technique by inserting fabric into the seams. This method works on any garment with a similar structure.
10. Can I still add embellishments after completing the bell bottoms?
Yes! Once your bell bottoms are complete, you can personalize them with patches, embroidery, or beads for an extra retro touch.

