
Fabric plant containers have revolutionized the gardening world, offering an economical, lightweight, and adaptable solution for cultivating plants. Whether your goal is to maximize limited space on a small patio or enhance drainage and airflow for your plants, creating your own plant containers is a fantastic choice. This guide will walk you through the process of making DIY grow bags in any size using landscape fabric—no expert sewing knowledge required!

The Advantages of Homemade Plant Containers
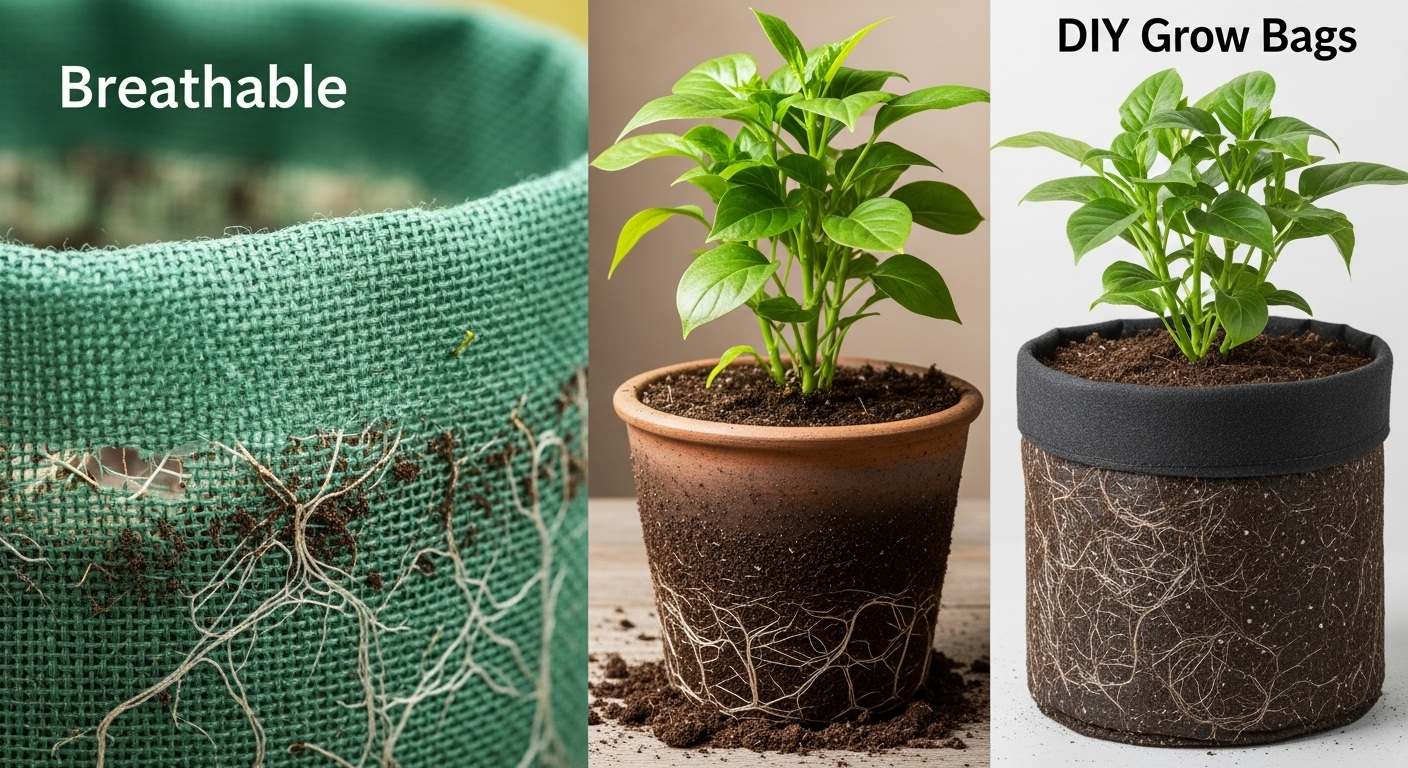
Explore the benefits of DIY plant containers for healthier plants, reduced expenses, and customized gardening setups. Ideal for every gardener.
Perks of Using Grow Bags
- Economical: Constructing plant containers at home can cost as little as $1.50 each, even when incorporating handles.
- Lightweight and Easily Moved: Unlike traditional clay or ceramic containers, plant containers are simple to relocate, making them perfect for tight spaces or rearranging your garden.
- Superior Drainage and Air Circulation: Landscape fabric’s porous nature prevents overwatering and promotes robust root development.
- Fully Customizable: Create containers in any dimension to perfectly match your gardening aspirations.
- Simple Storage: These containers can be easily folded and stored in a small area during the off-season.
Selecting Materials for Longevity and Practicality
DIY plant containers are typically crafted from landscape fabric, sometimes called weed barrier fabric. This material is durable, light, and resistant to the elements. By using multiple layers, you can improve moisture retention without sacrificing breathability.
Essential Supplies
Before starting the sewing process, gather these necessary items:
- Landscape Fabric: Choose a robust, 7-year rated variety. Two layers provide optimal strength.
- Outdoor-Rated Sewing Thread: Specifically designed to withstand sun exposure and moisture.
- Denim Sewing Machine Needles: Heavy-duty needles perfect for handling tough materials like landscape fabric.
- Webbing (Optional): For handles, use 1-inch-wide webbing. Reuse old straps from bags to minimize costs.
- Basic Sewing Tools: Scissors, pins, and a sewing machine.
Understanding the Costs
Each medium-sized plant container (roughly 12 inches in both diameter and height) requires:
- Four pieces of fabric, each measuring 18 x 18 inches.
- Two 18-inch lengths of webbing (optional for adding handles).
Priced at around $1.50 per container, this project is very affordable, especially when compared to commercially available alternatives.
Step-by-Step Guide
Discover how to make DIY plant containers with easy-to-follow instructions, along with tips for success, diverse uses, and earth-friendly gardening concepts.
Step 1: Preparing the Fabric Pieces
- Determine Your Desired Size: Select the appropriate dimensions for your needs. For a medium container, cut four fabric pieces to 18 x 18 inches each.
- Prepare the Material: Ensure all fabric pieces are precisely the same size for consistent stitching.

Step 2: Sewing the Sides Together
- Align and Secure with Pins: Take two fabric pieces and line them up along one edge (Side A). Use pins to hold them in place.
- Sew Along Side A: Use a ¼-inch or ½-inch seam allowance. Either is fine, but maintain consistency.
- Repeat for Side B: Stitch the second side to create a tube-like form.
Step 3: Creating the Base
- Flatten and Match Seams: Lay the fabric flat, making sure seams A and B are aligned in the middle.
- Pin and Sew the Bottom Closed: Pin the bottom edge of the tube and stitch across it to close the base.

Step 4: Shaping the Container
- Adjust the Seam Positions: Move seam A to the left and seam B to the right, forming a box-like shape.
- Pin the Center Points: Find the center points on the top and bottom edges between the side seams and secure them with pins.
- Sew the Rounded Base: Locate the center points on the edges and draw stitching lines to create a rounded shape. Sew along these lines.
Step 5: Finalizing the Project
- Turn the Container Inside Out: Once the main shape is complete, turn the container right side out to conceal the seams.
- Hem the Top Edge: Fold the top edge down to create a neat finish and stitch it in place.
- Attach Handles (Optional): For easier carrying, sew webbing handles onto medium and large containers. Space the handles evenly for balanced weight distribution.

Key Tips for Success
- Maintain Consistent Seams: Always use the same seam allowance throughout the project for a uniform appearance.
- Strengthen Handles: If adding handles, double-stitch them to ensure they can support the weight of the soil and plants.
- Reuse Existing Materials: Save money by using webbing from old bags or other reusable items.
- Customize to Fit Your Needs: Experiment with different sizes to create plant containers suitable for various plant types.
Diverse Applications for Plant Containers
DIY plant containers are not just for gardens. Here are some innovative uses:
- Urban Gardening Solutions: Perfect for patios, balconies, and other small spaces.
- Seasonal Planting: Use them to cultivate herbs, vegetables, and flowers throughout the year.
- Hanging Displays: Add handles to create hanging plant containers for walls or fences.
- Temporary Homes for Plants: Use them to start seedlings or move plants as needed.

Proper Storage and Upkeep
Proper maintenance ensures your plant containers last for many seasons:
- Cleaning Process: Remove the soil and rinse the containers with water. Allow them to air dry completely before storing.
- Storage Guidelines: Fold and store the containers in a dry location during the winter months to prevent mold.
- Repair Solutions: If seams come undone, repair them with a quick stitch using outdoor thread.
Environmentally Responsible and Sustainable Gardening
Creating your own plant containers supports ecological sustainability:
- Reduced Plastic Consumption: Landscape fabric is a more eco-friendly alternative to disposable plastic pots.
- Durability and Longevity: High-quality materials ensure long-lasting use, reducing the need for frequent replacements.
- Recyclable Components: Fabric and thread can often be repurposed or recycled after their initial use.
Final Wording:
DIY plant containers are a valuable asset for any gardener. With just a few basic supplies and simple sewing techniques, you can create strong, reusable containers customized to your specific requirements. They are not only cost-effective but also enhance plant health by providing exceptional drainage and aeration. Whether you’re gardening on a small balcony or managing an extensive garden, these versatile containers offer endless possibilities.
So, gather your materials, follow this guide, and experience the satisfaction of making your own plant containers. Happy gardening!
Frequently Asked Questions About DIY Plant Containers
Find answers to common questions about DIY plant containers, including their benefits, materials, and tips for successful gardening. Suitable for all skill levels.
1. What other fabrics can I use to make plant containers?
You can try using materials such as felt, cotton, canvas, or duck cloth. However, natural fabrics like cotton and canvas may not retain water as well, are more prone to staining, and can rot faster than synthetic options. Felt is a good alternative, but make sure your sewing machine is capable of handling it.
2. Can I create plant containers without any sewing?
Yes, you can use staples or adhesives instead of stitching. By strategically folding the fabric, you can minimize or even eliminate the need for sewing altogether.
3. Is landscape fabric a breathable material?
Yes, landscape fabric is breathable and porous, allowing air to reach the roots of plants and excess water to drain effectively.
4. Can I use these plant containers for aquatic plants?
While it’s not a typical application, you can attempt to use them for aquatic plants. However, fabric plant containers are not generally designed for underwater use, and their durability in such conditions may vary.
5. Should I use two layers of heavy-duty landscape fabric?
If you’re using 15-year or a similar grade of heavy-duty fabric, doubling it may not be necessary. However, thinner fabrics benefit from having two layers to improve water retention.
6. Can plant containers support large amounts of soil?
Yes, you can create large plant containers (such as 40 gallons or more). Ensure that the stitching is robust, and consider reinforcing the handles to support the weight.
7. How can I ensure the fabric is free of chemicals?
Look for landscape fabric that is labeled as non-toxic or chemical-free. Thoroughly research products to ensure they are safe for growing edible plants.
8. Can I repurpose other materials to make plant containers?
Yes, old clothing items like denim or work pants can be repurposed into plant containers. This method is both cost-effective and eco-friendly, although the durability may vary.
9. How can I make plant containers more sturdy?
Reinforce the handles by sewing them between layers of fabric. This will ensure they can handle the weight of the soil and plants without tearing.
10. What size plant containers are best suited for specific plants?
Small containers: Ideal for herbs or seedlings.
Medium containers: Well-suited for tomatoes or peppers.
Large containers: Best for root vegetables like potatoes or carrots.

