
Share This Article
Curtain weights are a simple yet effective way to improve the look and function of your drapery, ensuring they hang gracefully, minimize unwanted movement, and exude sophistication. Instead of buying ready-made options, this tutorial on DIY curtain weights demonstrates how you can craft personalized weights using readily available materials. With straightforward instructions and budget-friendly supplies, you can seamlessly integrate these subtle yet impactful additions into your curtains.

Why You Should Consider Using Curtain Weights
Curtain weights are crucial for achieving a smooth, consistent drape, particularly for lighter materials that are prone to shifting. They are ideal for:
Advertisement
🔥 Fast & Free Download

- Minimizing Curtain Sway: Stop curtains from billowing or swinging due to breezes or activity in the house.
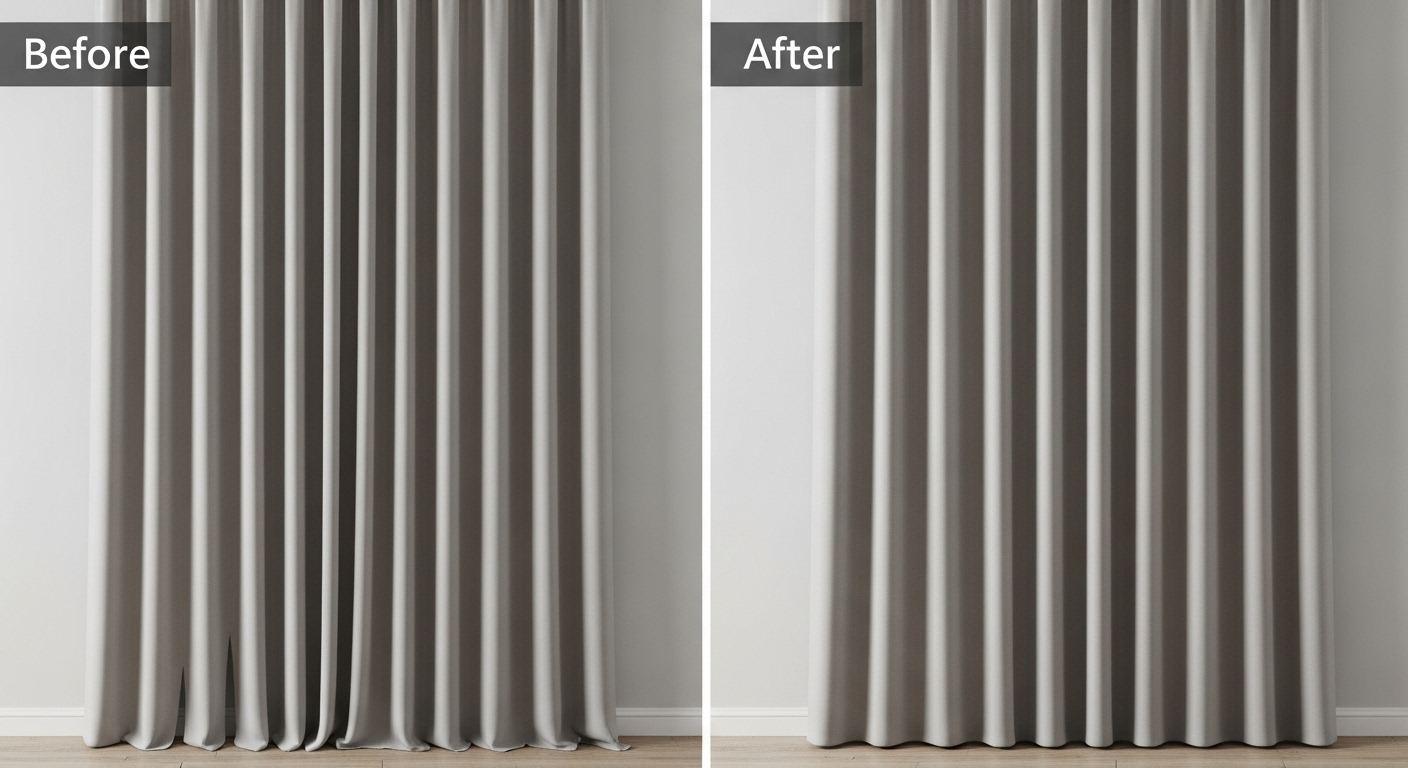
- Creating a Polished Appearance: Ensure the curtain edges hang straight and neat, resulting in an elegant visual.
- Enhancing Practicality: Weighted curtains are easier to control and maneuver, making them suitable for both residential and commercial spaces.
What You’ll Need to Make Your Own Curtain Weights
Creating your own curtain weights is an easy project requiring just a few essential items. Here’s a list of what you’ll need:
- Lining Material: Leftover lining fabric is ideal; it should be sturdy enough to contain the weights without ripping.
- Recommended Dimensions: Around 22 cm in height by 50 cm in width, though you can customize this based on your particular needs.
- Lead Discs or Coins: Typically, small coins or lead curtain weights approximately 2.5 cm in diameter are used.
- Pinking Shears: These will prevent the edges of the fabric from unraveling.
- Sewing Machine and Thread: Any standard sewing machine will work for creating the small pockets to hold the weights.
- Pins and Scissors: For precise measuring and cutting of your fabric.
Step-by-Step Guide
Discover how to create your own DIY curtain weights with our easy-to-follow guide. Follow these steps to add a professional touch to your curtains.
Step 1: Prepare Your Fabric
- Cut the Material: Measure and cut your lining fabric to the appropriate dimensions, approximately 22 cm by 50 cm, although this can be adjusted depending on the number of weights you intend to make.
- Fold the Material: Fold the fabric in half along its length. This will create a double layer, increasing the strength of each weight pocket.

Tip: Doubling the fabric strengthens the pockets, reducing the chance of tearing under the weight.
Step 2: Plan and Measure Weight Placement
- Position the Weights: Arrange your weights (lead pieces or coins) on the fabric to determine the number of pockets required.
- Account for Seam Allowance: Around each weight, leave approximately 1 cm of seam allowance on each side. This will help create a secure pocket for each weight.
- Measure and Mark Pocket Size: Measure around each weight, allowing 4 cm of fabric for each pocket. This spacing will ensure the weights are evenly spaced without being too constricted. Note: If you’re using coins or smaller weights, you might need to slightly alter these measurements to ensure a snug fit.

Step 3: Stitch the Pockets
- Start Sewing: Using your sewing machine, sew the pockets along the lines you marked, ensuring enough space to insert each weight.
- Strengthen Each Pocket: Begin sewing at one end, securing each pocket with a simple seam. Leave a gap between the rows to allow easy access for adding the weights later. Tip: Backstitch at the start and end of each pocket to prevent the stitches from coming undone.

Step 4: Add the Weights
- Insert Weights into Pockets: Once the pockets are sewn, insert each weight individually. Ensure they settle at the bottom of each pocket.
- Check the Fit: After all the weights are in place, verify that they fit comfortably without too much movement within the pockets.
Step 5: Secure the Weights
- Close the Pockets: To secure the weights, stitch across the top of each pocket to close it. This will prevent the weights from falling out when the curtains are moved or cleaned.
- Trim with Pinking Shears: Use pinking shears to cut between each pocket, preventing fraying and providing a clean finish. Leave enough fabric to keep the stitching intact.
Pro Tip: Don’t worry if the pockets aren’t perfectly identical; slight variations won’t be noticeable once they are sewn into the curtain.
Attaching the Weights to Your Curtains
With the weights prepared, it’s time to attach them to your curtains.
- Determine Placement: Curtain weights are most effective at the bottom corners and along the seams in the middle, where the fabric tends to separate.
- Stitch the Weight to the Curtain: Open the hem at the desired locations, insert the weight, and stitch it securely to the fabric. Ensure each weight is attached to the back layer of the curtain fabric to keep it hidden. Tip: For balanced draping, add weights in a consistent pattern along the curtain hem.
Alternative Materials and Helpful Hints
- Using Coins as an Alternative: If you don’t have lead weights, coins like small change or other heavy currency can be effective. Just make sure each coin is securely wrapped in fabric before sewing it into the pocket.
- Removable Weight Pockets: If you’d prefer removable weights, consider sewing the pockets with Velcro closures. This allows you to adjust the weight as needed and simplifies washing.
- Additional Placement Ideas: For heavier materials, think about placing weights at every third or fourth seam. Lighter materials generally need fewer weights, concentrated at the bottom corners.
Concluding Tips for DIY Curtain Weights
- Make a Batch: If you frequently make curtains, consider creating a large set of weights in one session. This makes it easier to add weights as needed for future projects.
- Experiment with Location: The amount of weight needed varies depending on the fabric and window location. Feel free to experiment with placement to get the best results.
- Create DIY Curtain Tape: Think about making your own curtain tape pocket from lining fabric to further customize your curtains and streamline weight attachment.
With this guide, you now possess the knowledge to craft your own curtain weights. From sourcing materials to sewing and integrating them into your drapes, each step is straightforward and achievable with basic sewing equipment. This approach not only saves money but also adds a personalized touch to your home décor. Enjoy the benefits of beautifully draped curtains and the satisfaction of completing a successful project!
Frequently Asked Questions About DIY Curtain Weights
Find answers to common inquiries about DIY curtain weights, covering everything from materials and tools to installation advice, for perfectly hung curtains.
1. Can I substitute other household items for lead weights or coins?
Certainly, many items found around the house can work as makeshift weights. Small rocks, metal washers, or even spare nuts and bolts can be effective, provided they are securely sewn into the fabric.
2. How much weight should I use for my curtain weights?
The required weight depends on the type of curtain fabric. For light fabrics, coins or small lead weights are generally sufficient. Heavier fabrics might require larger or more weights along the hem.
3. Is it safe to use curtain weights on curtains that need to be machine washed?
Yes, but it’s advisable to use removable weights or secure them in Velcro pockets to simplify the laundering process.
4. Will curtain weights cause damage to the fabric over time?
When properly sewn, curtain weights should not damage the fabric. Using soft lining fabric for the pockets helps cushion the weights and prevent wear.

