
Share This Article
Table of Contents
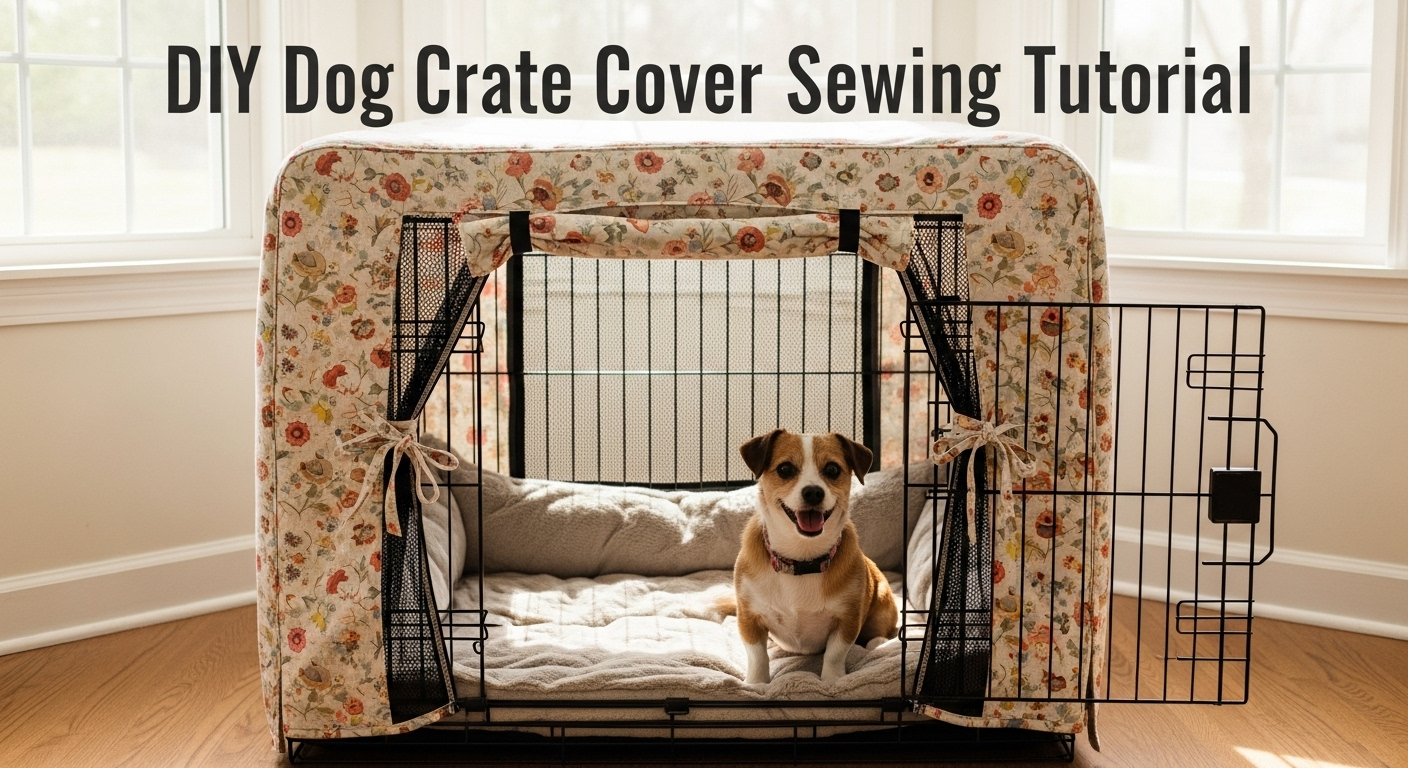
Crafting a DIY dog crate cover is a wonderful way to customize your furry friend’s personal haven, offering both comfort and a touch of elegance. With some fundamental sewing know-how and readily available materials, this project is quite achievable. A custom crate cover can foster a calming environment, shield against chilly air, and boost your dog’s sense of security. Furthermore, it presents an excellent opportunity to coordinate your dog’s crate with your home’s aesthetic.

This comprehensive guide offers a detailed, step-by-step method for you to sew your own DIY dog crate cover, ensuring a perfectly tailored fit. Whether you have a petite or sizable dog crate, adapting the dimensions to match your specific requirements is simple.
Advertisement
🔥 Fast & Free Download

Eager to commence? The subsequent segment will lead you through the required supplies and the detailed procedure for creating your own DIY crate cover.
Essential Materials
- Fabric: I opted for a robust and easily washable fabric, prioritizing durability and effortless maintenance. The pattern was also a key consideration, as I wanted it to blend flawlessly with the room.
- Sewing Machine: A must-have for securely stitching the fabric pieces together.
- Heat n Bond: Used to maintain straight and secure seams before the final stitching.
- Cricut Mini or Iron: For activating the Heat n Bond adhesive.
- Self-Healing Cutting Mat and Rotary Cutter: These tools ensure precise, clean fabric cuts.
- Double Fold Bias Tape: Adds a refined and polished finish to the edges.
- Pins and Clips: Helpful for keeping the fabric aligned during the sewing process.
- Ribbons: Used for neatly tying back the crate cover opening.
- Fabric Filling: Needed to stuff the crate pad, making it soft and inviting.
- Scissors: For precisely cutting both the fabric and the stuffing material

Step-by-Step Instructions
Discover how to fashion a chic DIY dog crate cover with our straightforward, easy-to-follow instructions. Ideal for any dog owner wishing to infuse a personalized element into their pet’s space!
Step 1: Accurate Crate Measurements
Initially, it was crucial to meticulously measure Rhodey’s crate – from the back to the front, side to side, and from top to bottom. Precise measurements are key to ensuring the cover fits snugly, avoiding any areas that are too loose or too tight.
Step 2: Fabric Cutting
I proceeded to cut the fabric according to the measured dimensions. Utilizing the selvage edge helped me achieve a consistently neat and straight line across the crate. If you’re using patterned fabric, careful alignment of the patterns is essential for a seamless aesthetic.

Step 3: Preparing the Seams
To ensure my seams remained straight and secure, I employed Heat n Bond. This is a wonderful aid for those who, like myself, may not be seasoned sewing experts. I applied it along the fabric edges, using a Cricut Mini to activate the adhesive with heat, and then folded the sides inward for a clean, finished appearance.
Step 4: Assembling the Cover
This tutorial will guide you through the process of putting the cover together. It provides comprehensive steps for the top and side sections, with special attention given to the corners. Perfect for your DIY endeavor!
Top and Side Sections
I started with the top and side sections, employing the self-healing cutting mat and rotary cutter for precise cuts. After folding each side of these sections and securing them with Heat n Bond, I applied double-fold bias tape to achieve a refined edge.
Corner Construction
For the corners, I unfolded the bias tape, made a slight fold, and then folded it back to create a small pocket for tucking in the corner fabric. This technique conceals any unfinished edges and guarantees a polished final look.

Step 5: Attaching the Cover to the Crate
Once all the sides were prepared, I used pins to attach the fabric panels directly onto the crate. This allowed me to accurately mark where the top, sides, and bottom pieces would join. After confirming the alignment, I sewed the panels together.
For extra functionality, I sewed ribbons onto the front panel, enabling it to be tied up and kept open when needed. Adequate ventilation is vital, and this approach enhances airflow while preserving the cozy, den-like atmosphere.
Step 6: Crafting the Plush Crate Pad
Discover how to create a snug and soft crate pad: from cutting the fabric and stitching the edges to stuffing and sealing the pad. A comprehensive guide for the ultimate pet bed!
Fabric Cutting
I selected a soft, luxurious fabric that Rhodey seemed to favor. I cut it to roughly match the dimensions of his current crate pad, ensuring a comfortable fit.
Edge Stitching
With the fabric edges secured together with pins, I used the sewing machine, leaving a small opening for turning the fabric inside out and adding the filling. The stitching didn’t need to be perfect, just sufficient to hold everything in place.

Pad Filling
I evenly distributed the fabric filling throughout the pad. This process can be a bit messy, so be prepared for some stray fibers in your workspace!
Pad Closure
After stuffing the pad, I top-stitched the opening closed, completing the crate pad.
Final Adjustments and Evaluation
Following the completion of the cover and pad, I arranged them in Rhodey’s crate. The fit was perfect, providing a comfortable and stylish improvement over the old beach towel. Rhodey tested it out and appeared quite satisfied, which was the most gratifying part of the entire undertaking.
Personalization Suggestions for Homemade Dog Crate Covers
Creating a DIY dog crate cover is not solely about practicality; it also provides an opportunity to inject a personal flair into your pet’s area. Here are several suggestions to assist you in tailoring your dog crate cover:
- Select the Appropriate Fabric: Pick a fabric that embodies your pet’s character or complements your home’s interior. Explore durable options such as canvas for a robust cover, or soft fleece for a warm feel.
- Incorporate Useful Pockets: Sew pockets onto the sides to store toys, snacks, or grooming implements. This ensures essentials are readily accessible and your space stays organized.
- Integrate Windows: Cut out sections and sew in mesh panels to promote ventilation. This enables your pet to observe the surroundings and aids in regulating the crate’s internal temperature.
- Customize with Appliqués: Embellish the cover with appliqués like your pet’s name, paw prints, or playful designs. Employ iron-on patches for a straightforward update.
- Adapt for Size: Ensure the cover fits snugly around the crate. Add Velcro straps or ties for effortless removal and modification.
- Consider the Season: Prepare interchangeable panels or covers for different seasons. Utilize lighter fabrics for summer and denser, insulated materials for winter.
- Prioritize Safety: Avoid loose embellishments or strings that pets might chew or become entangled in. Always emphasize your pet’s safety in your design choices.
By heeding these suggestions, you’ll create a dog crate cover that is not only functional but also a testament to your care and ingenuity. Keep it uncomplicated, concentrate on your pet’s welfare, and relish the process!

Addressing Typical Challenges with DIY Dog Crate Covers
While making a DIY dog crate cover, you might encounter a few minor setbacks. Here’s a valuable guide to resolving common issues, ensuring your project turns out perfectly:
Incorrect Fabric Fit
- Solution: Double-check your crate dimensions before cutting the fabric. Include extra inches for seam allowances and adjustments. If the fabric is too small, add additional panels to enlarge it.
Cover Slippage
- Solution: Secure the cover using ties or Velcro strips attached to the corners. This will keep it in place, even with your dog’s movements.
Mesh Window Fraying
- Solution: Use a zigzag stitch or fabric adhesive to prevent fraying. Strengthen the window edges with extra stitching or bias tape for added durability.
Rapid Fabric Fading
- Solution: Opt for fade-resistant fabric or treat it with a UV-protective spray. Keep the crate out of direct sunlight when possible.
Difficulty Sewing Dense Fabrics
- Solution: Use a heavy-duty needle and adjust your sewing machine’s tension. Proceed slowly to ensure consistent stitches and avoid breaking the needle.
Persistent Cover Odors
- Solution: Select odor-resistant materials or include a removable lining that can be laundered regularly. Consider using a fabric refresher between washes.
Loose Embellishments
- Solution: Avoid decorations that can be easily chewed off or detached. Choose embroidered designs or securely sewn-on patches instead.
By anticipating these potential issues and knowing how to address them, you’ll be better equipped to create a practical and stylish dog crate cover.
Frequently Asked Questions About DIY Dog Crate Covers
Explore answers to common inquiries about DIY dog crate covers, ranging from material selections to customization advice, ensuring both comfort and style for your canine companion.
1. What is a DIY dog crate cover and why should I make one?
A DIY dog crate cover is a custom-made covering for your dog’s crate, providing privacy and allowing it to integrate better with your home’s decor. Making one is economical, allows for tailoring to your crate’s precise size, and lets you select fabric that complements your living space.
2. Are there any easy DIY dog crate cover designs for beginners?
Indeed, there are designs that require minimal skill, such as utilizing tension rods and curtains to fashion a cover, or simply draping an attractive blanket over the crate. These choices are excellent for those seeking a swift and straightforward solution without the need for tools or sewing.
3. Can I make a multi-functional dog crate cover?
Certainly! Some innovative DIY enthusiasts have created crate covers that also serve as end tables or other furniture pieces. This involves additional materials like wood, screws, and tools, but the outcome is a functional item that conserves space and enhances your home’s appearance.
4. How do I ensure the dog crate cover is safe and comfortable for my pet?
Ensure the cover provides adequate ventilation to keep your pet comfortable. Avoid materials that can cause overheating or restrict airflow. It’s also crucial to use non-toxic materials and secure the cover to prevent it from falling or entangling your pet.
5. How can I personalize my dog crate cover to match my home’s style?
Personalizing your dog crate cover is both simple and enjoyable. Select a fabric that aligns with your interior design, whether it’s a timeless pattern, a striking color, or a contemporary print. You can include decorative trims, such as piping or fringes, for added flair. For a more practical design, consider adding storage pockets or windows with adjustable roll-up shades for variable privacy.
Final Thoughts:
Creating a personalized DIY dog crate cover and pad proved to be a fulfilling endeavor. The steps were uncomplicated, and the outcome was a comfortable setting for Rhodey that harmonizes seamlessly with our home’s decor. If you’re aiming to enhance your pet’s crate, adhere to this guide, and you’ll have a beautifully covered crate and a cozy pad in no time.

