
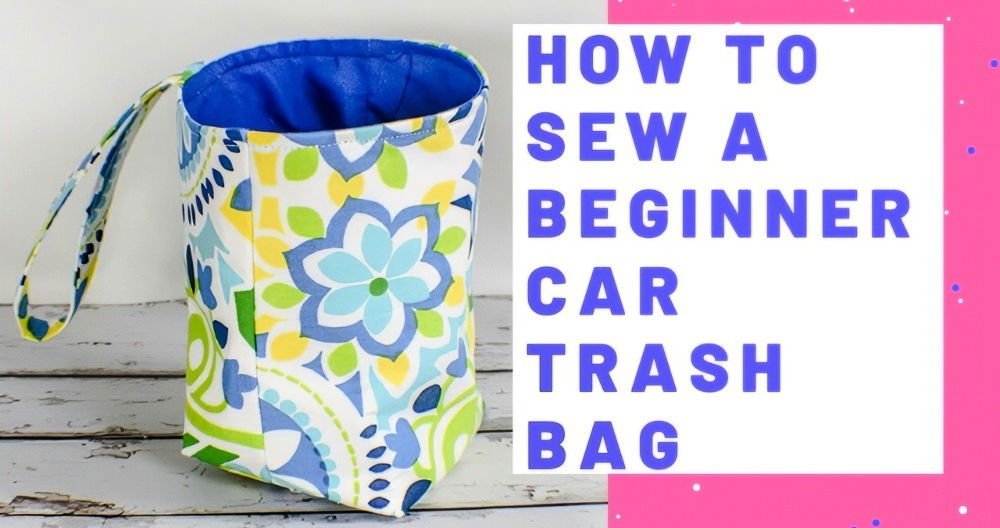
Are you struggling with wrappers and small debris accumulating in your vehicle? A DIY car trash can could be the perfect fix. Constructing your own auto waste bag is not just an easy sewing endeavor; it’s also a practical method for keeping your car neat and organized. This project is designed for beginners, meaning that even those with minimal sewing expertise can effortlessly complete it.

Within this DIY tutorial, you’ll discover how to fashion your own auto waste bag using just a few basic materials. Whether you choose to utilize fabric remnants or purchase new material, this useful project will assist you in creating a convenient car accessory in a short amount of time. Furthermore, you can easily personalize it to complement your car’s interior or showcase your individual flair.
Essential Supplies
To stitch your car waste bag, you’ll require the following:
- Two pieces of external fabric (each measuring 10” x 10”)
- Two pieces of lining material (each measuring 10” x 10”)
- Two pieces of reinforcing material (each measuring 10” x 10”)
- Material for the strap (measuring 3” x 15”)
- Thread (select a color that coordinates with your fabric)
- Sewing machine and essential sewing tools (pins, scissors, iron, etc.)
Note: Reinforcing material is optional but highly advisable if you desire your car waste bag to maintain its shape and withstand wear. In this guide, we are employing Pellon Craft Fuse 808 for heightened rigidity, but feel free to use any reinforcing material you prefer or skip it if you want a more pliable bag.
Step-by-Step Guide
Discover how to craft a DIY car waste receptacle with our easy-to-follow guide. Clear instructions, from preparing the materials to adding the final touches, are included.
Stage 1: Preparing Your Components
The initial stage involves cutting your fabric and reinforcing material into 10″ x 10″ squares. You’ll need a pair of external fabric pieces, a pair of lining material pieces, and a pair of reinforcing material pieces. Also, cut your strap material into a 3” x 15” rectangular shape.
- Tip: If you’re working with scraps or leftover bits, this is an excellent chance to utilize them! You can even combine different fabrics for a more unique aesthetic.

Stage 2: Affixing the Reinforcing Material
Attaching reinforcing material enhances the strength and longevity of your waste bag, particularly if you anticipate it enduring everyday use.
- Position the adhesive side of the reinforcing material (the side with the glue) against the wrong side of your external fabric.
- Ensure the edges are perfectly aligned and press with a heated iron for approximately 10 seconds, moving across the surface to guarantee the glue adheres effectively. Take care to avoid shifting the fabric during pressing to prevent creases.
- Replicate this procedure for both external fabric pieces.
- Note: If you’re unfamiliar with using reinforcing material, don’t be concerned—it’s straightforward! The secret is to ensure the adhesive side bonds correctly by applying ample heat and pressure.

Stage 3: Stitching the Outer Bag
Now that your external fabric has reinforcing material attached, it’s time to sew the pieces together.
- Position the two external fabric pieces with their right sides facing each other (the right side is the “attractive” side of the fabric).
- Stitch along three sides (the two vertical sides and the bottom), leaving the upper edge open.
- Maintain a 1/2-inch seam allowance for this stage.
- After stitching, trim any stray threads and set the external bag aside.
You’ll now have a small pouch that will serve as the external casing for your car waste bag.

Stage 4: Stitching the Lining
The process for stitching the lining is akin to the external bag, with one significant distinction: you’ll need to leave an opening at the bottom.
Stage 5: Shaping the Corners
Creating boxed corners provides your bag with a structured shape, enabling it to stand independently.
- Unfold the seams of your external fabric and align the side seam with the bottom seam to form a triangular tip.
- Secure this tip with a pin and stitch across the seam, approximately 2 inches from the tip. This will create a boxed corner.
- Repeat this action on the opposite side of the bag.
Replicate the same steps for the lining fabric. Bear in mind that the boxed corners should be uniform in size for both the external fabric and the lining.

Stage 6: Constructing the Strap
While the primary component of your bag is now assembled, you’ll require a strap to suspend it from the gear shift or another suitable location within your car.
- Take your strap fabric and fold the raw edges towards the center lengthwise.
- Press the folds using an iron.
- Fold the strap in half lengthwise once more, enclosing the raw edges.
- Topstitch along both edges of the strap to ensure it remains securely folded.
This strap will facilitate easy suspension of your waste bag in the car.

Stage 7: Assembling the Bag
Now is the time to assemble the bag.
- Turn the external bag right side out, while keeping the lining inside out.
- Secure the strap to the upper edge of the external bag with a pin, positioning it roughly halfway across the opening.
- Subsequently, insert the external bag into the lining bag, ensuring that the right sides of the fabrics are facing each other. The two bags should fit closely together, with the strap nestled between the layers.
- Align the side seams and secure the entire upper edge with pins.
Stage 8: Stitching the Outer and Lining Together
With everything secured in place, it’s time to stitch the external and lining layers together.
- Stitch around the entirety of the bag’s upper edge, encompassing the strap. Ensure you stitch back and forth over the strap to enhance its durability.
- Once stitched, reach through the opening in the lining and invert the bag by pulling the external fabric through the hole.
Stage 9: Closing the Lining
Following the inversion of the bag, the final step is to close the opening in the lining.
- You can close the opening manually using a ladder stitch, which provides a neat, almost invisible finish. Alternatively, you can close it with a sewing machine, as this section will be concealed within the bag.
- Once the hole is closed, tuck the lining into the external bag.
Stage 10: Final Touches
To impart a professional finish to the bag, press the upper edge and topstitch around the bag’s top. This will aid in keeping the lining in place and prevent it from shifting during use.
Finally, your DIY car waste bag is complete! The strap enables you to suspend it from your car’s gear shift, providing a convenient spot to dispose of small pieces of waste during your daily travels.
Extra Pointers and Suggestions
- Fabric Selection: Opt for a fabric that is resilient and simple to clean. You could even use waterproof fabric for the lining to simplify the cleaning process.
- Embellishments: Feel free to personalize your waste bag by incorporating decorative elements, such as patches, embroidery, or fabric paint.
- Size Modifications: If you desire a larger or smaller bag, adjust the fabric dimensions accordingly. For instance, you can create a deeper bag by cutting the fabric squares to 12” x 12” instead of 10” x 10”.
- Velcro Application: For an alternative suspension method, consider adding Velcro to the strap, enabling effortless attachment and detachment of the bag.
Final Wording
Constructing a DIY car waste bag is a practical and gratifying project that introduces convenience and organization to your vehicle. With merely a handful of fabric pieces and fundamental sewing abilities, you can fashion a stylish and functional waste receptacle that aids in maintaining a tidy car interior. Most importantly, this project is quick to execute and adaptable to your specific requirements.
Try this project and reap the rewards of a clutter-free vehicle! Happy sewing!
Frequently Asked Questions About DIY Car Waste Bins
Find solutions to prevalent inquiries concerning DIY car waste bin alternatives, materials, and usage for a well-organized, environmentally conscious driving experience.
1. What should be the size of the fabric pieces for this project?
You will require two 10” x 10” squares for the external fabric, two 10” x 10” squares for the lining, and two 10” x 10” squares for the reinforcing material. The strap fabric should measure 3” x 15”.
2. Is it necessary to use reinforcing material for this project?
Reinforcing material is optional but recommended to provide additional structure and durability. If you prefer a softer bag, you can omit it. Pellon Craft Fuse 808 is suggested for added sturdiness.
3. How do I box the corners of the bag?
To box the corners, align the side and bottom seams, form a point, and stitch 2 inches from the tip of the point. This step assists the bag in retaining its shape.
4. Can I incorporate a waterproof lining?
Yes, employing waterproof fabric such as PUL or applying iron-on vinyl to the lining can simplify cleaning. Some individuals also use a shower curtain liner for water resistance.
5. How do I modify the strap if I intend to suspend the bag in a different location?
If suspending the bag from the back of a car seat, you’ll need a longer strap. Measure the headrest’s circumference with a string to ascertain the appropriate length.
6. What should I do if my corners appear bulky?
To minimize bulk, you can trim the excess fabric from the boxed corners before inverting the bag. Some individuals prefer leaving the corners intact for improved structure.
7. Can I create a larger bag?
Yes, you can adjust the size by cutting the fabric to larger dimensions, such as 12” x 12” or 16” x 16”. Keep the strap proportional or adjust its length depending on where you plan to suspend it.
8. Is the reinforcing material machine washable?
Yes, most reinforcing materials, including Pellon, are machine washable. However, always consult the specific instructions for best care. Ensure it’s securely fused to prevent peeling.

